Tuesday 31 December 2013

Simple and Delicous Slow Roasted Ribs


For my bridal shower I recieved the Company's Coming recipe book "Anytime Casseroles".  It is by far my favorite one that I own - and definitely the recipe book I use the most.  As a farmer's wife, casseroles are a staple food on our menu and these recipes are all made from ingredients that I either regularly stock in my fridge or I can easily get in our small town grocery store.  This rib recipe is my favorite from the book (with a few of my own changes).  These are so tender that I was able to eat mine with a fork because the meat fell right off the bones.  I couldn't keep a recipe this good to myself so I thought I would share it with you.

Prep Time: 15 mins
Cook Time: 3 1/2 hrs
Servings: 2

Ingredients:
1 lg rack (or 2 sm racks) of pork ribs
1 tbsp brown sugar
1 tbsp garlic salt
1 tsp table salt (or sea salt)
1 1/2 tsp coarse ground pepper
BBQ sauce of your choice flavor

Recipe:
1. Combine the brown sugar, garlic salt, table salt and pepper
2. Rub the above mixure into the ribs and arrange them in a casserole dish
3. Bake the ribs - covered - for 3 hours at 250°F, and flip at half time
4. Coat the ribs in BBQ sauce and cook for an additional 30 mins uncovered
5. The ribs are done! Combine with your favorite side dishes and enjoy!


Saturday 28 December 2013

Our Week in Review


Hello again! I hope that Christmas treated you well - it certainly did us.  I've spent most of the week getting in some quality time with Brett and both of our families. We all ate way too much (it wouldn't be the same if we all didn't gain five pounds), and I even cooked my very first turkey.


Mom and Dad got me a new stethoscope for Christmas! Yay! This picture really shows my desperate need for a hair cut too. Yikes.
I also had time to do some knitting - I am working on a scarf for Brett and I hope to post the pattern as soon as the scarf is done. Sadly I think I might be the worlds slowest knitter when it comes to scarves - but know that I am trying very hard to get it done in a timely manner.

Saturday 21 December 2013

DIY Crocheted Mittens


As promised, here is a pattern that uses the back post and front post double crochet stitches!  I usually wear a size large mitten, but these fit pretty tight on my hands so this pattern would be congruent with a normal size medium.  I suggest measuring this pattern on your hand as you go, just to make sure that it is fitting properly (and add or decrease stitches as needed).  I love how these mitts turned out - they are pretty and super warm.  Here is the pattern!

What you will need:
2 balls of worsted weight yarn (320 yds total) - I used Bernat satin
5mm (U.S. 8) crochet hook
Scissors
1/4 yd minky fabric (to coordinate with yarn)
Thread to match fabric
Sewing machine or hand sewing needles

Abbreviations:
Ch = chain
Sl St = slip stitch
Sc = single crochet
Dc = double crochet
FPDC = front post double crochet
BPDC = back post double crochet
*For instructions on the FPDC and BPDC go here.

1.  Make the cuff.
a. Ch 21
b. Sc in each chain
c. Sc in back loop of each Sc
d. Sc (normal) in each Sc
e. Repeat steps c & d until cuff reaches 14" long

Alternating rows of Sc in the back loop and normal Sc makes the ribbing of the cuff.

f. Sl St the ends together to make an actual cuff.


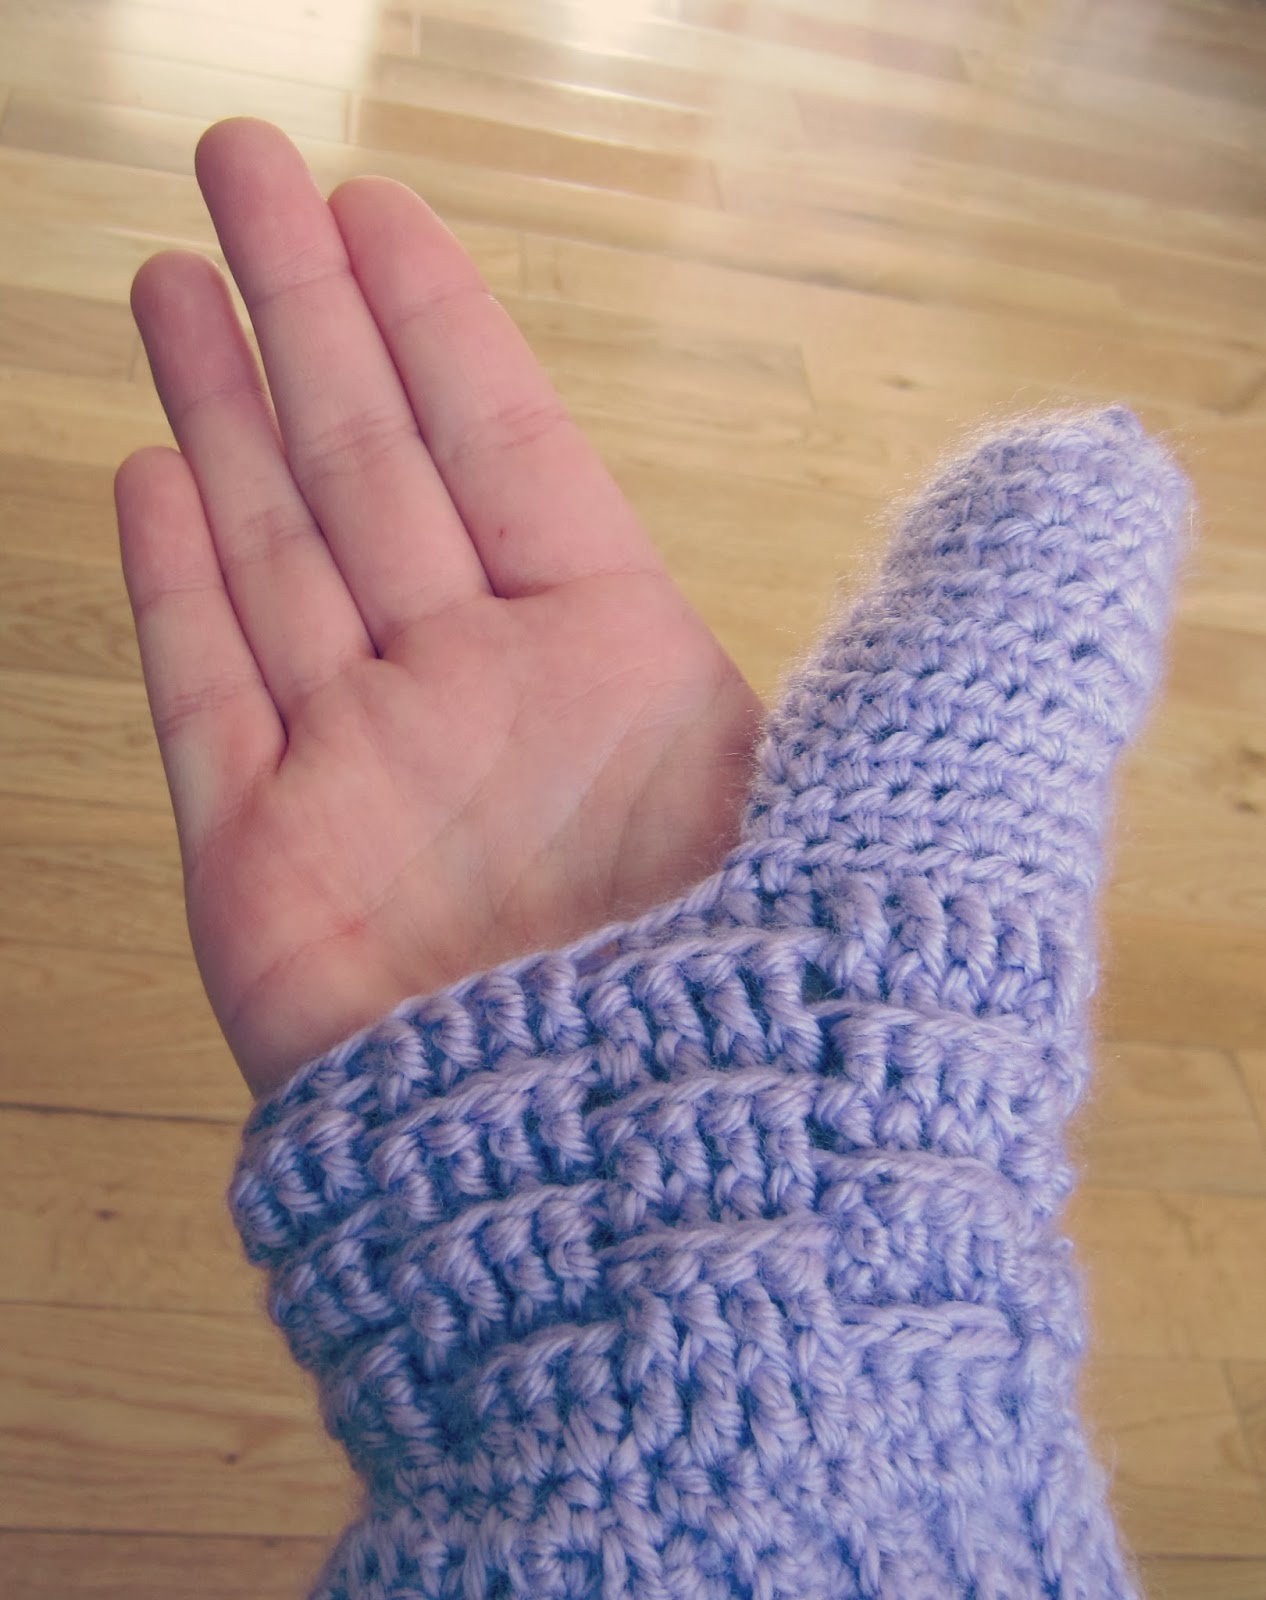
2.  Start on the hand.
a. Sc around the top of the cuff - 36 Sc total around
b. Dc in each Sc around
c. *4 BPDC, 4 FPDC *repeat around (for instructions go here)
d. FPDC in each BPDC and BPDC in each FPDC around
e. Repeat x6 rounds

3.  Make the thumb.
a. Ch 10
b. Skip 8 Dc and attach with a Sl st
c. Sc around the thumb x6 rounds
d. Skip 1st Sc, Sc around the thumb
e. *Skip every 2nd Sc *repeat around the thumb until the thumb is closed
f. Tie off
Thumb is finished!

4.  Continue with the hand
a. Tie onto the corner of thumb and the hand


b. Continue putting FPDC on top of BPDC and vice versa around the hand
c. When you get to the thumb, attatch with a Sl St, turn and repeat x2


d. The thumb will be attached now, continue putting the FPDC on top of the BPDC and vice versa around the hand
e. Repeat step d x10 rounds, adding in 1 stitch each round (I find that this pattern tends to get tighter as you go on, so the added in stitch is pretty necessary)
f. Skip every 2nd Dc around the loop, repeating until the hand is closed in on itself
g. Tie off

5.  Line the Mitts
a. Cut out the shape of your hand in the minky fabric


b. I used a simple running stitch around the lining.  You can use a sewing machine (I just didn't because I didn't have mine with me at the time).


As an aside, I absolutely despise working with minky fabric.  It is slippery and leaves fuzz everywhere; the fuzz is really similar to insulation, which makes for great mitten lining, but is extremely annoying to work with.

My pants, after sewing the lining for these mitts.  I had to have Brett vacuum me after.
c. Now insert the lining into the mitts, fold the tops over to make a nice hem and sew them down.


You're done!
I am happy to answer any questions, so leave them in the comments section.

Thursday 19 December 2013

My Christmas Favorites


Only six more days left until Christmas Day!  I have one more exam to write tomorrow before I am home free and done the term.  To celebrate the closure of Term 1 a day early, here are my Christmas Favorites for the year.

Smell: Freshly peeled and cut apples for apple pie

Tradition: Going to the Christmas Eve church service in our small town.  All the church groups (United, Lutheran, etc.) from our little town unite to do one lovely service.  This is only my second year going (since it is only my second year of really being a part of Brett's community) but I cannot wait to make this service a long time tradition for our family.

Movie: The Family Stone.  This is a wonderful Christmas movie.  If you haven't seen it, I strongly recommend watching it, but make sure you keep a box of tissues nearby.

Hymn: O Holy Night.  Particularily these two lyrics:
               Truly he taught us to love one another,
               His law is love and His gospel is peace

Memory: One of my favorite memories of my childhood Christmases was when we would read out of this special Christmas book my Aunt Viola bought us.  I can't remember the name of the book, but it was basically a collection of Christmas storys, carols and stories about what Christmas is like in other countries.  The whole family would gather and someone would read a few stories out of the book.  I loved sharing this quiet moment with my family.

Gift: Usually my favorite gift to recieve is jewelry.  It is something that I always love getting, but will rarely buy for myself.

Sight: My home after being away at school.

Dislikes: Trying to get any last minute shopping done at the mall.

Your turn now!  What are some of your Christmas favorites?

Tuesday 17 December 2013

Tuesday Inspiration


Today this quote made me stop and think.  Sometimes I find that we get so focused on ourselves, or what is going on in our own lives that we forget to think about the good that we can be doing.  I know I am certainly guilty of this is in my own life.  As a nursing student, it is so easy to get caught up in the actual skills of nursing (practicing my IV starts, giving medications, etc.) that I can sometimes forget why I wanted to be a nurse in the first place: to make a real difference in someone's life.  It is easy to forget during day to day life the simple things you can do to make someone else's day better.

Sometimes I find it frustrating, living in the city, because we don't relate to people here the way that we do back home in our rural area.  Where I come from, you wave at everone you meet on the road and say hi to whoever you meet (whether you know them or not).  This isn't the case a lot of the times in the city.  But I never thought about how I could be the change I wanted to see.  Instead of being frustrated that no one is saying hi to or smiling at each other, why not say hi and smile myself?  I feel like this message is especially important around the Christmas season.  The holidays are a time of joy for a lot of people. However, for anyone experiencing a loss or going through a tough time in life, the Christmas season can be really hard.  You never know what the person next to you in the grocery line is going through; and you also never know what a simple smile or hello could do for their day.

Thursday 12 December 2013

DIY Christmas Stockings

Since this is our first Christmas in our home there are a lot of decorations that I would like but that we will just have to do without this year.  We will slowly have to pick up pieces throughout the years because to buy all of the decorations that I want all in one go would be way too expensive.  Christmas stockings, however, are something that I wasn't willing to do without; so I decided to make them myself and monogram them.

What you will need for 2 stockings:
1 yard unbleached muslin
1/4 yard each of two different but coordinating fabrics that match your Christmas color scheme
Coordinating embroidery thread (for either machine or hand embroidery of the monogram)
Embroidery hoop (if hand embroidering)
Coordinating thread
20" coordinating ric rac
Scissors
Iron
Ironing board
Sewing machine

1.  Start by drawing and cutting out the stocking shape.

2.  Now cut out the cuff pieces and sew them together.  For the mens stocking, also cut out a 14" piece of ric rac.

For the ladies stocking, now is the time to cut out and hem the ruffle.

3.  Attach the cuff to the front and back of the stocking.

For the mens stocking:

For the womens stocking:


4.  Turn the stocking inside out and sew.


5.  Now turn the right way out and press!

Fewf!  You are done!  Hope you enjoyed making the stockings.  Good thing there isn't a page limit to these posts!


Tuesday 10 December 2013

Meanwhile, in Saskatchewan


Brett and I got to go home to the farm for a bit between my exams and on one of our days at home we got a bit of a blizzard.  Luckily, this wasn't the day that Brett and his dad were supposed to be hauling grain!  I got to stay cuddled inside and make our Christmas stockings (stay tuned, on Thursday I will be posting the tutorial for these).  It always amazes me the weather extremes we get here in Canada.  It has been -30°C (about -22°F) without the wind chill for the past week.  When summer time comes, it will get up to +30°C (about 86°F) without a humidex rating.  A lot of people ask why we would live here when the weather is so crazy.  But there is nothing I love more than being in the combine with Brett on a beautiful fall day, or sitting in the truck bed enjoying a summer sunset, or being with Brett in the seeder on a spring morning.


The farm and this land is a part of me.  This is where I grew up, where Brett and I want to build a life and raise our future kids and grow old together.  This is why I couldn't ever leave, bad weather or not.  I guess each storm that we get through here on this prairie is another thread, tying me to my home.

Saturday 7 December 2013

How to Back Post Double Crochet and Front Post Double Crochet


I am going to be using both the front and back post double crochet stitches in an upcoming crochet tutorial.  I wanted to post the how-to for the stitches before I posted the whole tutorial, to make it all a little easier.  These were new stitches to me, so I figured that they might also be new to you.  In the photos, I used an "x" to mark the stitch we are working on top of and the new stitch once it is formed.  I tried to break it down in a simple way, but if you have any questions, don't hesitate to ask them in the comments section.


When alternated, this is how the front and back post double crochets look - they have sort of a brick-like pattern that I thought was cute.  I will be using this in a mitten pattern, but this would look nice in a blanket too.


First we will start with the Back Post Double Crochet

1.  As you can see in step 1, we just wrap the yarn as you would usually start a double crochet.
2.  Now, working from the back, you weave the crochet hook over top of the stitch you are working on top of.  As you can see in the picture, the "double crochet post" that you are working on top of is behind the crochet hook.
3.  Now continue to yarn over and pull through, as you would with any other double crochet stitch
4.  Step four shows the finished back post double crochet.  You can see that this stitch has a sort of separation from the double crochet post beneath it (this is what makes it look different than the front post double crochet).

Now for the Front Post Double Crochet

1.  Again, we start with the same yarn over as you would for a double crochet.
2.  Now, we work from the front and weave the hook behind the stitch that you are working on top of.  In the picture, you can see the previous double crochet post is in front of the crochet hook.
3.  Now continue to yarn over and pull through as you would with any other double crochet stitch.
4.  In the picture, you can see the new double crochet looks like a continuation of the double crochet post beneath it.

Thursday 5 December 2013

How I Met My Husband

In some of my favorite blogs, the authors have a section about their love story.  I find this is such a great way to get to know the person whose writing I am reading.  I would like to share the same with you.  Also, I would like to write down the story now, while it is still fresh and I can remember all of the details.

I am going to write the story in parts, so stay tuned for the updates :)

Brett and I grew up on farms that were very close to each other, yet we had never met.  He is three years older than me and we went to high schools in different small towns.  I met his little brother in Grade 12, because he played hockey with my friends and he a friend of my little sister.  At the end of high school, Austin (my little sister) made a joke about how she and Lee (Brett's little brother) should set Brett and I up on a blind date.  We laughed about it and even looked up Brett on facebook - creepy, I know - but never actually thought about it seriously.

September rolled around and I moved away from home to attend university.  This was a huge transition for me, I was living three hours away from home in a city - when I had hardly ever left the farm or our small town before.  On one particularly hard day in September when I was feeling lonely, Austin decided to cheer me up by setting me up with Lee's older brother.  The plan was for her to give my number to Lee, who would then give it to Brett.  I laughed it off and didn't think Austin would actually ever do it.

Brett and I (left) and our matchmakers Lee and Austin (right)
Fast forward a couple of hours and I get a text from a number I didn't recognize.  I couldn't believe it, but sitting in my messge box was a text saying "Hi Aubrey, this is Brett Tollefson.  I hope you aren't really creeped out right now, my brother swears you know that he gave me your number."  I told him that no I wasn't creeped out, but I couldn't believe he had actually texted me.  For a little background on this situation, this was completely out of character for Brett and I.  We are both pretty quiet people, and Brett would be the first to say he was a little timid when approaching women.

Somehow, despite this really strange way of meeting, we hit it off immediately and found that we were talking all the time.  It only took Brett a day or so to ask me out on our first date.

To be continued...    

Tuesday 3 December 2013

The Search for the Perfect Bag

My perpetual shopping dilema is finding the perfect bag.  I think this stems from two major problems:

      1.  General lack of funds (isn't the student life great)
      2.  Pickiness

Budgetary restriction is something that I am really hoping will be fixed upon my graduation from nursing school.  The other day Brett asked me what I would treat myself to once I graduated.  My first response was new flooring (our house is basically all carpet and I am dying to rip it all out and replace it with laminate or hardwood).  But Brett said, "No, this is something that is just for you.  So flooring doesn't count."  When he graduated, he got himself our current car - one that he had been dreaming about for years.  I don't think that my grad nurse salary will quite cover a new Jeep Grand Cherokee (sigh), so I decided that the purse of my dreams would be my gradutation treat.  But I must find the perfect one - so I decided I had better start my research early.  This is more my kind of research (vs. all the research for my term papers).

My general pickiness is the next problem to deal with.  I generally like large bags, and they have to be super organized inside (ie lots of pockets).  But I also would like a really nice statement bag in a bright color.  I always get sucked into the neutrals for purses, because they are so versatile.  But for this one, I would really like something more unique.  Below are my top 5 favorite bags so far.  It will be interesting to look back on this in a year and a half and see how much my tastes and the styles have changed!


1.  Danier "Diana" - style #137010068 in bordeaux (you can find this here)
2.  Matt and Nat "Epea" in ivy (you can find this here)
3.  Tiffany "Reversible Tote" in tiffany blue (you can find this here)
4.  Louis Vuitton "Retiro Pm" in monogram canvas (you can find this here)
5.  Danier "Lori" - style #131011313 in red (you can find this here)

I probably will end up with a bag from Danier.  Not only do I love how functional and organized their bags are, I am also quite cheap.  Much as I love to dream that I will some day have a Louis Vuitton bag, the chances of me being able to justify spending $1500 on one are pretty slim - unfortunately.

Which is your favorite??

Sunday 1 December 2013

That "Wow We're Married!" Moment


Last night, Brett and I went out on a date.  It was lovely.  We went to Browns Social House for the first time, it was nice to try out a new place and have it be really good.  It is pretty small inside, which gives the whole place an intimate atmosphere.  Also, they have mimosas on special for $5 on Saturdays.  Anywhere that I can get a mimosa for $5 is going to be one of my favorites.  Unfortunately, I forgot our camera and so I had to use our iPhone cameras to take pictures (definitely not the best) - so I apologize for the blurriness.

Cheers!

In the booth behind us there was a couple who were clearly on their first date.  They were so cute and awkward around each other, it made me think back to the early days of our relationship.  I was so nervous on our first few dates, thank goodness Brett could carry the conversation without too much input from me for the first little while.  In the middle of this reminiscing I realized "Holy cow, we are married!"  I get those moments every so often, we've only been married for five months, so its still a novelty.  Sometimes they happen when I sign my married name, or see my married name; and sometimes they just happen when I am thinking back to when we had first started dating.  We have both changed so much, basically grown up together.  I was only 18 when we started dating - now I am 21!  To someone who has been married or together for a long time, three years must seem so insignificant.  But for me, I almost can't remember what life without Brett was like.  

Have you had the "Wow we're married moment"?  I'd love to hear about it!